
The Buick LaCrosse came in with a check engine light and a code P0496 “EVAP system flow during non-purge condition” with no other symptoms or concerns. In my research, I found that another common symptom of a failed purge valve in addition to the check engine light is difficulty starting after refueling. If you remember reading my earlier post about new parts, you’ll understand why I wanted to test the part and confirm the failure rather than just slapping on a new part based solely on a code.
First, a little explanation on EVAP systems. If you have half a tank of fuel, the other half is fuel vapor. In the old days, the gas cap would simply vent once a certain pressure was reached, but with all the emission standards on modern cars, we had to come up with a better way to seal the fuel tank and keep those vapors from escaping into the atmosphere, killing trees and baby seals. Evaporative emissions (EVAP) systems capture the fuel vapors in the fuel tank and burn them in the engine when conditions are right.
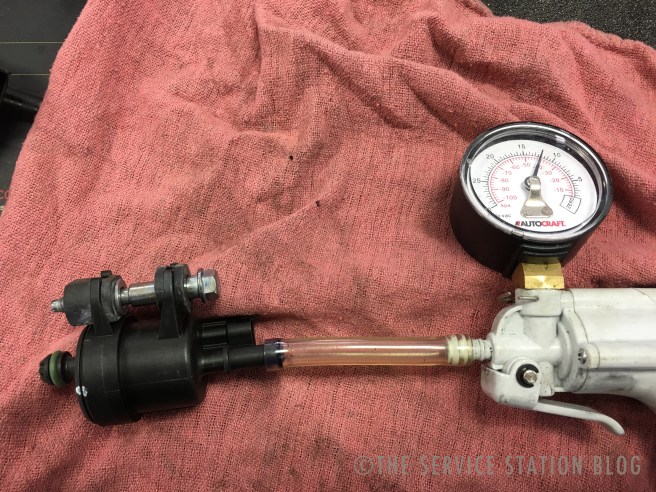
With the key in the off position, the purge valve should be CLOSED, allowing no fuel vapors to enter the engine. When the computer commands the solenoid to open, it allows engine vacuum to draw in fuel vapors from the vapor canister under the vehicle. A simple test is to connect a vacuum gauge to the inlet of the purge valve and apply vacuum. A good valve will hold vacuum while a failed valve will allow air to pass through and fail to hold a vacuum. This one failed to hold any vacuum so it was time for a new valve.

The valve isn’t very difficult to replace, but it can be troublesome to locate if you don’t have good service information. It’s located on the lower side of the intake manifold, close to the arrow above. Remove the engine cover and the air filter cover and intake hose to access the valve

There is one electrical connector and a hard plastic EVAP line attached to the valve with one 10mm bolt securing the valve to the manifold. Disconnect the line and electrical connector, remove the bolt, and pull the valve out. It may put up a little resistance because of the o-ring on the manifold side. When installing the new valve, lubricate the o-ring and be careful not to over tighten the bolt. Plug everything back in, replace the air filter cover and intake hose, snap on the engine cover, clear the codes, test drive, and return the vehicle to a happy customer!
I hope this article was helpful to you. Happy Wrenching!
Post contains affiliate links. When you use the above links to purchase products, I get a small commission at no additional cost to you. Thanks for your support!
