If you work on cars very long at all, sooner or later you will replace a gasket. Whether it’s a thermostat, water pump, oil pan, timing chain, or any number of other items it is likely to have a gasket. I will address the many different types of gaskets in another post, but this time I want to show you guys my favorite process for traditional paper gasket installation.
A lot of techs and DIYers will grab a tube of black or blue silicone and spooge it all over both sides of the gasket and sometimes, both mating surfaces. This usually not only makes a huge mess, but the gasket sealer squeezes in the oil/coolant/fuel passages and can cause some serious damage by clogging passages or pipes. Remember, when the water pump is tightened, whatever squishes out also squishes in. If I have to make a gasket, I have no problem using silicone, but I prefer to use this method for most paper gaskets.
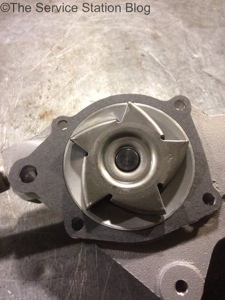
First, lay the gasket on the item to be installed. In this case, a water pump. It’s a good idea to lay out and properly orient the gasket before installation because it’s easy to put the gasket on upside down or rotate it in such a way that all the holes don’t line up right. This one, however, was pretty easy.
Once you’re satisfied the gasket’s aligned right, remove it and flip it over in a mirror image fashion
Once the gasket is removed, I like to lay it on a disposable surface like cardboard or paper. That way, if I get some gasket adhesive on it, I can just throw it away. If you look carefully, you will notice that I applied a small bead of sealer around the entire gasket area where it would contact the coolant. What I mean is I didn’t waste time going around the outside of the bolt holes because that wouldn’t seal anything.
The gasket adhesive I like to use is 3M Yellow Super Weatherstrip and Gasket Adhesive. PN 08002. You have to work quickly with it though, as it sets up pretty quickly. This can also be handy because it will hold the gasket firmly in place while you install the item. Apply the adhesive and press firmly on the gasket and let it set up for about 15 seconds and you’re good to go.
Notice that I only put the sealer on the side touching the removable piece (in this case, the water pump). This is so the gasket will be easier to remove from the block next time the water pump is changed. If you use sealer on both sides, the gasket will stick to the engine block and be very difficult to remove. Hopefully next time this water pump needs to be changed, the gasket will stay (mostly) attached to the water pump, and whatever is left on the block can be easily removed with a gasket scraper.
This is the thermostat mounting surface, not the water pump, but you get the idea. The key to a leak-free seal on the side without the adhesive is to have a very clean surface. I like to use 2″ Scotch-Brite die grinder discs on an angle die grinder, but you can use a plain old gasket scraper followed up with some steel wool or a green Scotch-Brite pad. Be careful with aluminum surfaces though, as you can easily deeply scar the metal and it will leak. With a clean surface like this, there is almost no chance for a leak and you don’t have to use sealer on this side which, as stated earlier, will make gasket removal much easier the next time around.
The final touch in a water pump or thermostat install such as this one is to use some thread sealant on the bolts. Not all bolts need sealant, but many times water pump, thermostat, and timing cover bolts come in direct contact with coolant passages and sealer must be used on them. If you don’t, I can guarantee a leak when you’re done.
Well, that’s it for this Tech Tip. Let me know what you think and shoot any questions to me in the comment section below. Have a great night!


Nice job on the article, especially the photo illustrations. Easily read and understood. Papaw would be proud. Would give you a grade but those days are over.
LikeLike
Glad you enjoyed it. I look forward to many more articles which will hopefully help people learn and understand more about the automotive industry as a whole.
LikeLike
nice blog about gasket installation. this one is very helpful. thank you for sharing
LikeLike
Thank you! I’m glad you enjoyed it!!
LikeLike